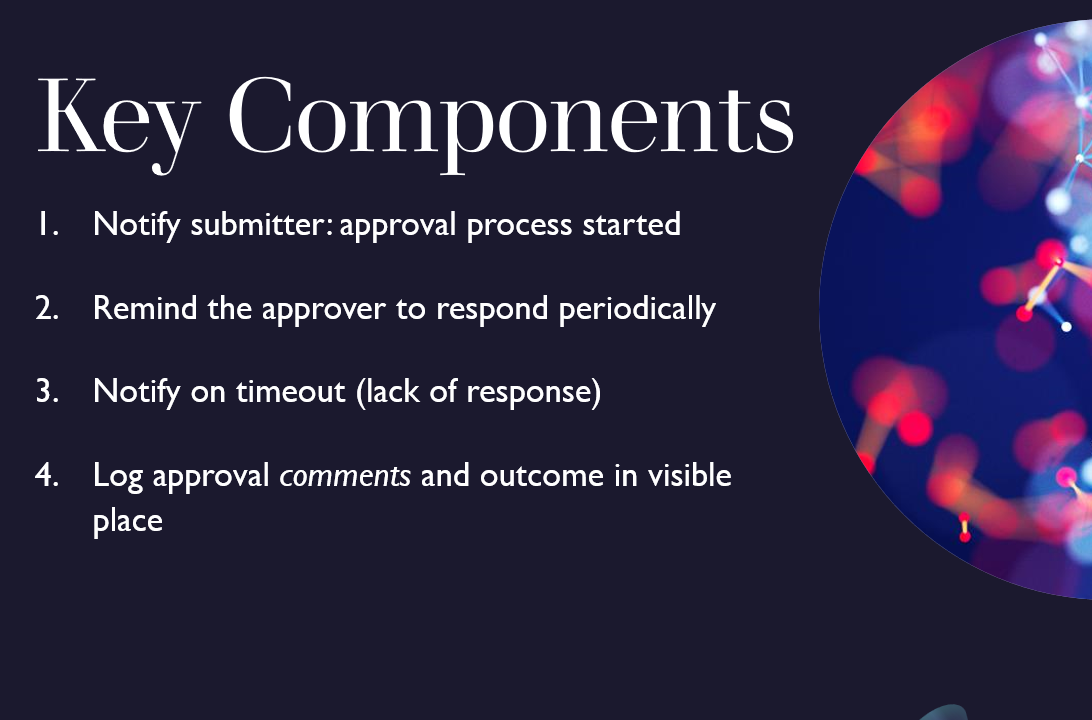
A good Power Automate approval flow has the following:
- Reminders that trigger if the approver has not responded in a specified timeframe
- Notifications to a process owner or reassignment on lack of approver response after an excessive amount of time
- Visible approval status on the item in question, with the outcome and comments if available
- Notifications to the submitter on the approval status
This article is part of a series on doing request management with Microsoft Lists, so you might check that out as well!
Power Automate makes it really easy to make a basic approval flow, but unfortunately it comes with none of the above out-of-the-box. I would super love if Microsoft would add something like a checkbox for reminders, at least, to the approval actions – but it’s been around as a tool for more than five years now, so I’m not holding my breath – time to DIY.
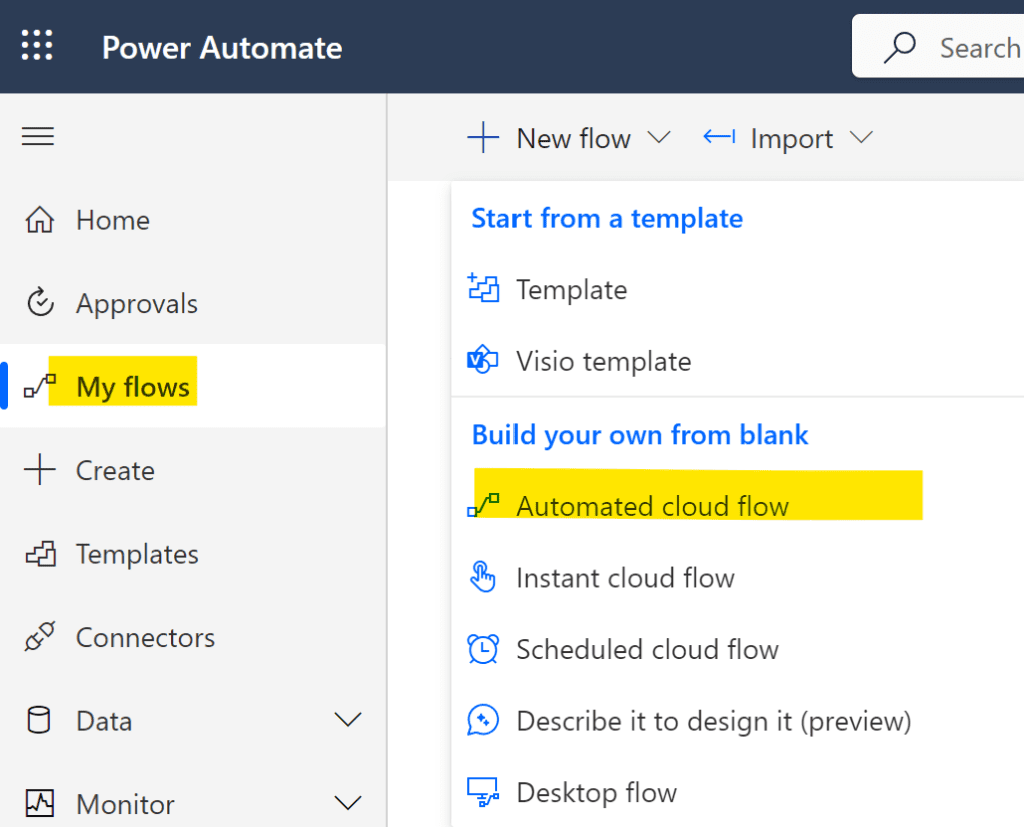
First, the basics – create the flow and connect to your source
This tutorial assumes you’re using SharePoint as a data source, however many of these techniques will work for other sources as well. Start by navigating to make.powerautomate.com, going to “my flows” and creating a new automated cloud flow. If you have a service account, log in with it and create the flows using the service account’s connections.
Not sure what a service account is? It’s just a Microsoft 365 user account that is not a person – we use this in Power Automate to run all of the connections that the flow uses so that if the individual who created the flow leaves the organization, all of their flows won’t start failing when their user account is disabled. Make sure the service account has permission on your SharePoint list, has a SharePoint license, and a Power Automate license.
You might consider at this point which environment you want to create this flow in – most people create them in the default environment by… default… but it’s considered best practice to have separate dev and production environments for Power Platform work. You can read more about environments on Microsoft Learn here.
Give it a descriptive name. I like to include a prefix here, particularly if it’s in a service account, that includes the department name – you can use it to scan down a list of flows to more easily find the one you’re looking for later (no, you can’t sort on the workflow name… that would be too convenient, unfortunately).
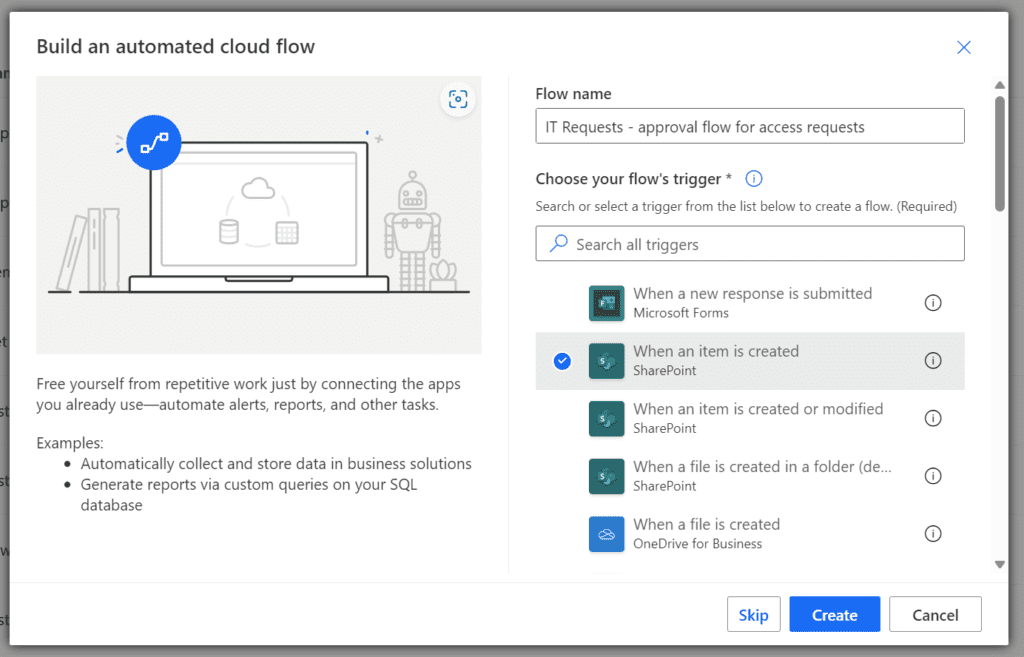
Enter your site and list in the trigger card settings.
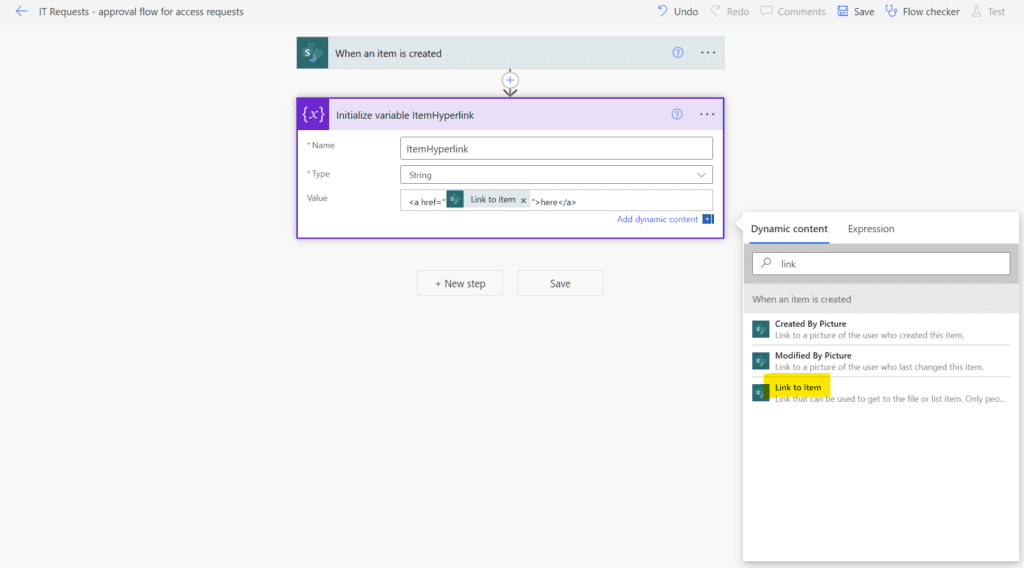
Create a string variable for each dynamic hyperlink you are planning on using in your flow email notifications
Okay, bear with me here. If you’re new to Power Automate, this may seem excessive, but it really is necessary and useful to do this.
The link inserter in the email editor will not let you reference dynamic content, and simply inserting the “link to item” dynamic content card in the email will not result in a clickable hyperlink, so we are going to create an HTML hyperlink in a variable instead.
- Add an “initialize variable” card to your flow. This particular card type always has to go “first” in your flow steps – you can’t initialize them inside of loops or conditional branches.
- Make it a string type, give it a name, and set the default value to something resembling this:
<a href="link to item - dynamic content inserted here">here</a>This will result in a hyperlink, with the link text “here”, that when clicked in an email will open your item in SharePoint. If you’re having trouble finding the “link to item” content, search in the dynamic content window for “link” and it should show up:
If you want, you can add another for a link to a “my items” filtered view if you have one in your list (a list view filtered on created by = [Me]). This would let you link your submitter to a view of all of their requests for their convenience.
Add a condition or switch if you want to use one
In this particular flow, we are going to trigger the approval only for certain request types, just to demonstrate the technique – so I’m going to add a new “condition” step to check the request category. You could also use a “switch” here if you want the approval to be handled differently and have more than two cases.
If you want to trigger the same approval process on all items, skip this step.
For our condition, we are referencing dynamic content – a choice field called Category, so we insert “Category Value“. Choice fields appear twice in the dynamic content menu – once with the word Value, which will be the text value of the field. That’s the one we want to use here.
I like to rename all of the cards with a description of what the step is doing for readability. You can do this in the ellipsis menu next to the card title.
Add the notification to the submitter about the pending approval
Add the action “Send an email v2” (the one with the Outlook icon, not the envelope icon). I’m adding this before the approval step, because the approval step waits until it has completed before continuing. You can search for the word “email” to bring it up:
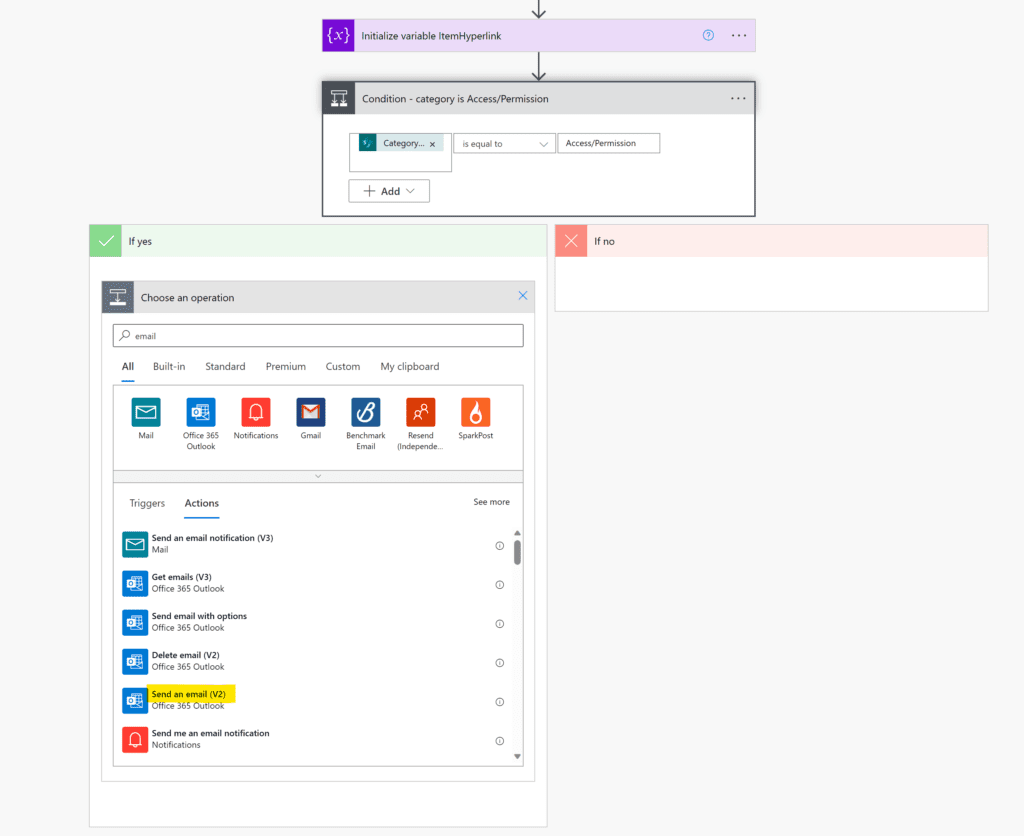
Have the “to:” go to the created-by user email from the dynamic content menu. This will be the user who submitted the form.
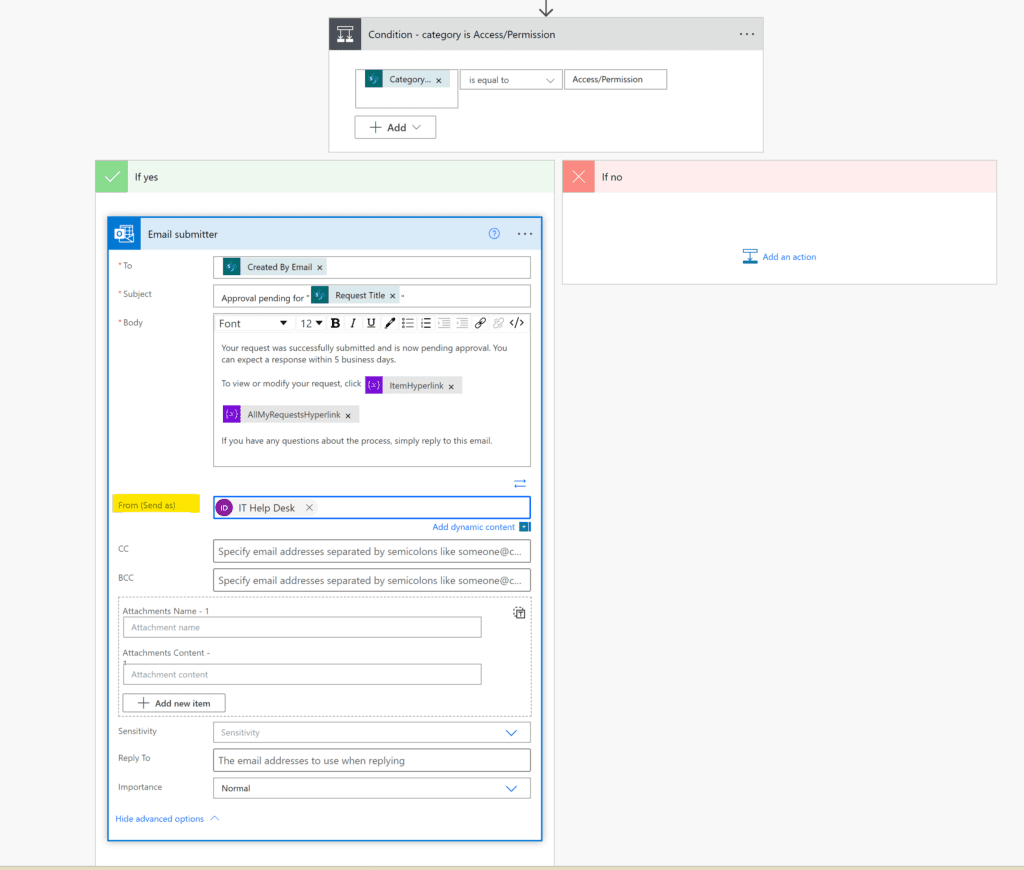
Configure the email
I like to insert the request title into the subject line, then link the user to their item and the “all my items” list view in the email.
If you enter a “send on behalf of” under “advanced options” and use the shared mailbox we created when setting up the SharePoint site here, the message will send from that shared mailbox and any replies will also go to the shared mailbox. This is a really useful feature, as it keeps responses from going to an unwatched mailbox and looks more professional. Note that sending mail on behalf of a mailbox requires permission changes by an Exchange administrator to the mailbox – this is not something that “comes with” being the owner of the M365 group like you’d expect. Here’s a post on how to add send-as permissions on the shared mailbox.
We’re also using the hyperlinks we created in the initialize variable steps in the email here. At this point, you might want to save the flow and submit the form yourself just to make sure everything looks correct.
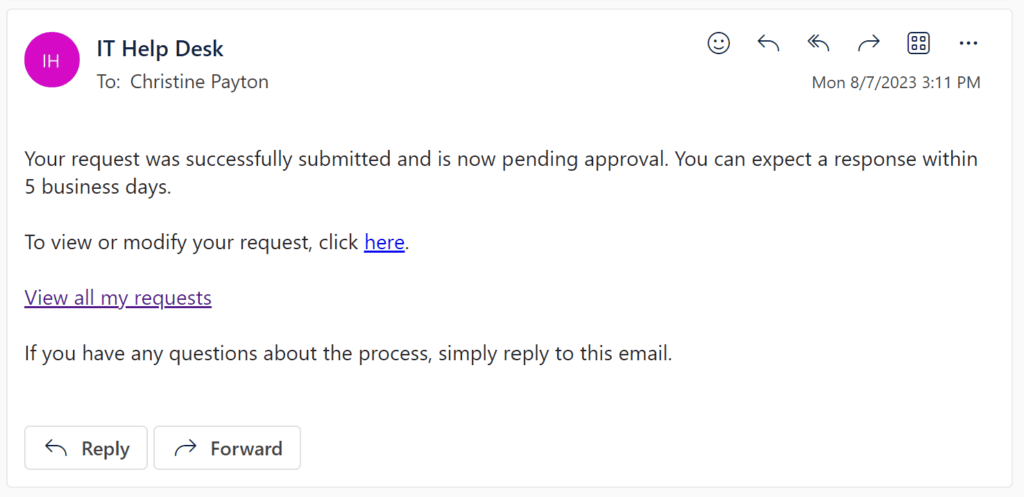
Here’s what the email looks like, note that it’s coming from the IT Help Desk. You can get fancier with these emails, but that’s a topic for another day – today we’re just trying to get the basics up and running.
Add the approval step
- Add “start and wait for an approval” under the email action – you can find it by searching for the word “approval” in the menu.
- Select the type. Here we’re doing “Approve/Reject – First to respond” because that’s the most common type and the easiest to manage reminders for.
- Add your approver email addresses in the “assigned to” field; I like to start with just my email address while I’m setting things up so that I’m not spamming the theoretical approvers while testing.
How to make an approval go to the submitter’s manager
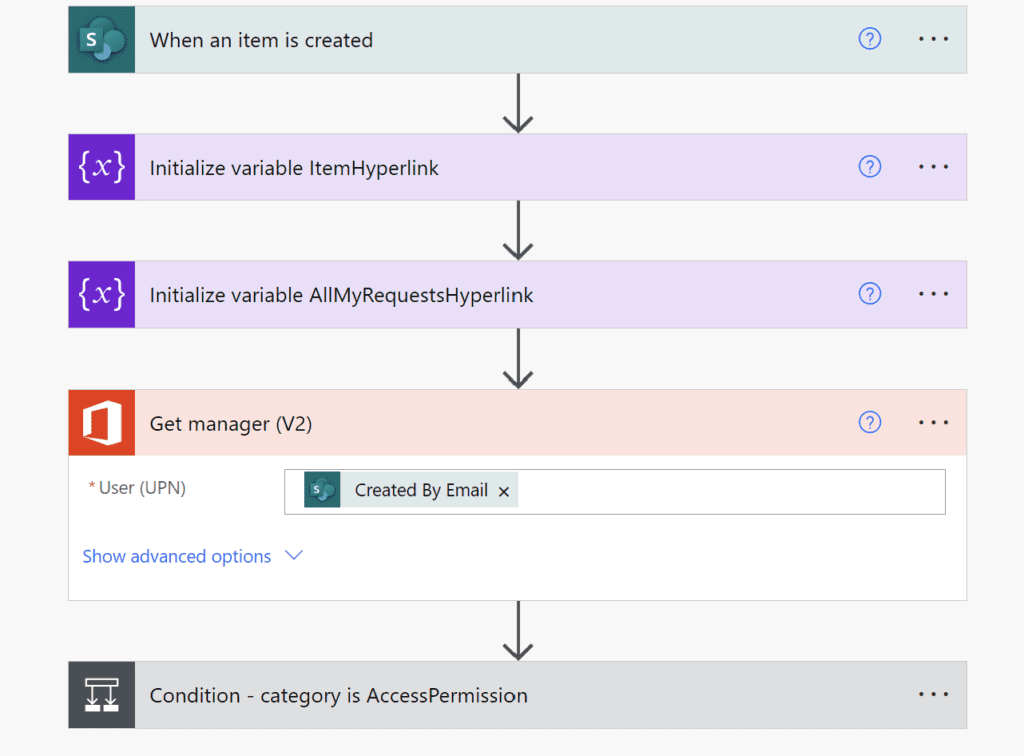
A need in an approval process is to get a manager’s approval. Lucky for us, there’s a built-in action to get the email address of the submitter’s manager. It’s called… “Get manager (V2)”. If you want to use this action, you need to put it up top above the condition step, and have it lookup to the created by user’s email:
Once you do that, the “Mail” (it’s called mail instead of email here, don’t ask me why…) for the manager is available to use for the assigned-to in the approval step.

Something to keep in mind when you’re using the “get manager” action for the user profile is that it is using the M365 user profile – make sure that the manager field is something that’s actually filled in in your user profiles before trying to use this action, if it’s blank it’ll cause your flow to fail when trying to reference the null value.
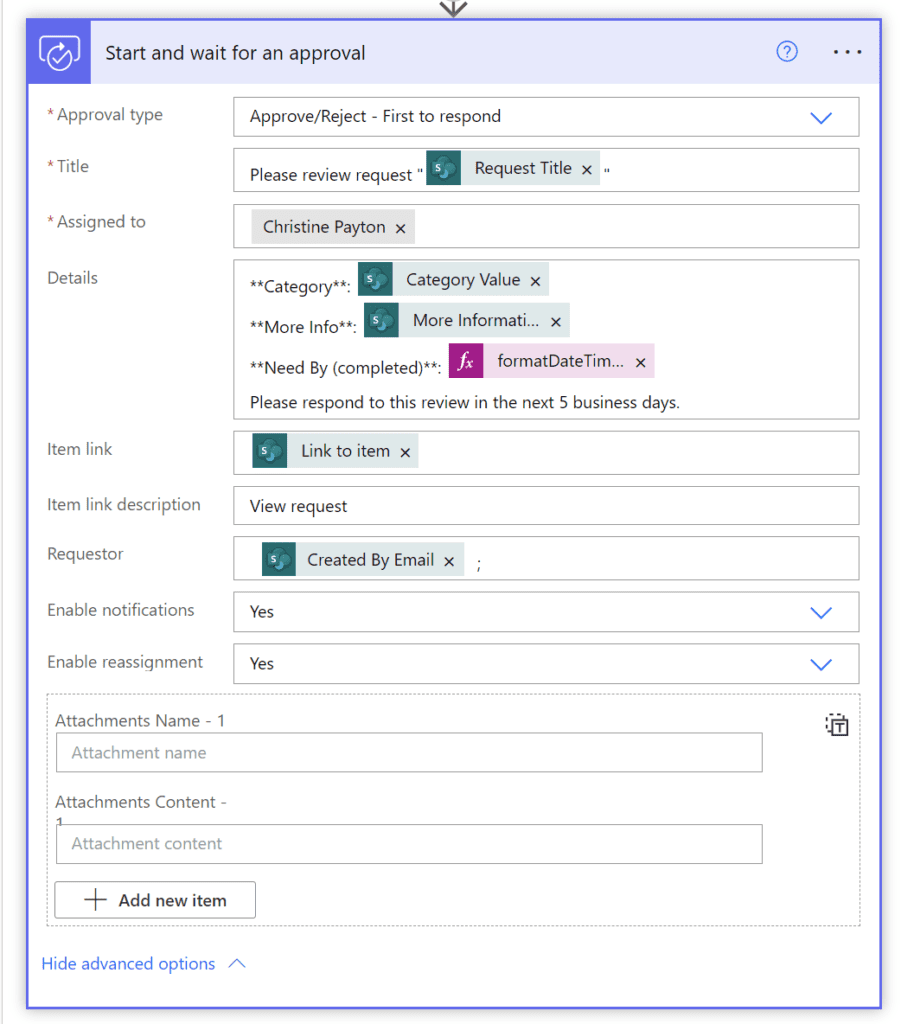
“Details” markdown
You’ll notice that the “details” field has some text about markdown and a URL. That URL has some info about how to format the details if you so choose. I’ve had varying success with the markdown over the years – trying it now, it seems to work for the most part, though the __italic__ option seems to actually bold my text instead of italicize, so your mileage may vary.
Here’s what I use details for – if your SharePoint list is set so that “users can only see their own items”, but you also are trying to run an approval flow on the list that goes to, say, the user’s manager, the permission for the manager becomes tricky. I don’t like to do item-level permissions in SharePoint lists as a rule, so what you can do as a workaround here is add the data from the submitted form into the approval details as text, and remove the hyperlink to the item – this gives them everything they need to approve without actually giving them permission on the item itself.
Formatting date fields
If you insert a date field in the details, you’ll notice that by default the format of date fields is very “raw”. You can friendly-format dates using a FormatDateTime() expression on the field in the dynamic content -> expression tab. You can insert dynamic fields directly into the expression by swapping between the tabs as you put it together – it can handle that much.
Here’s an example expression to format our Date Needed By Field:
formatDateTime(triggerOutputs()?['body/DateNeededBy'],'MM-dd-yyyy')Here’s what it looks like filled out with some formatting (the asterisks are “bold” in markdown). Note that you can set the requestor field to the created by email to have that be visible in the approval notifications:
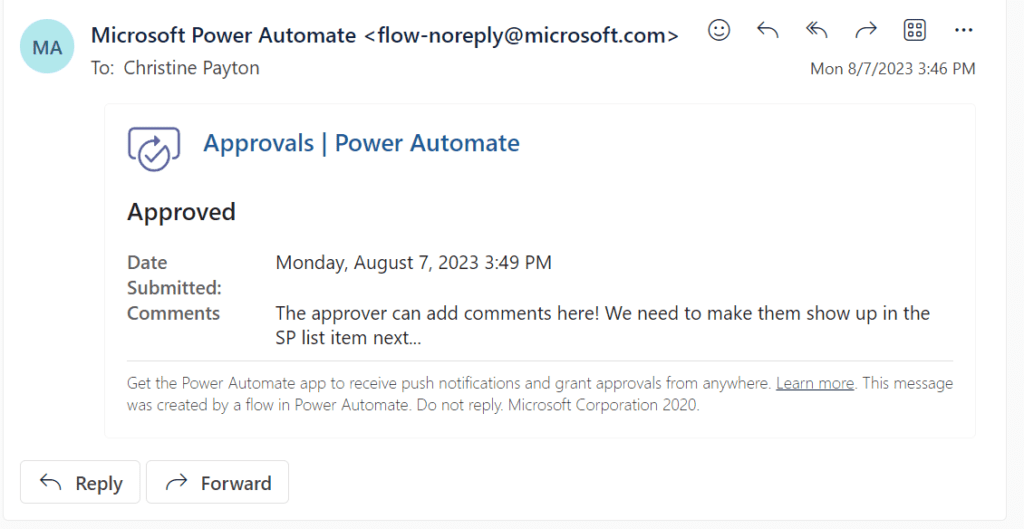
The Power Automate approvals are cool. When they come through in Outlook (or Teams, they give a Teams alert also) the recipient can add their comments and approve directly in the app.

Additional approvers who received the message can see that the request was already approved by someone else in near real-time, also! Below is a screenshot of what it looks like to me, but if it were an additional recipient they would see the name of the approver as well:
Great! An approver approved, now… something needs to let the submitter know
Since the submitter is not a participant in the approval, they don’t get any kind of alert that their request was approved unless we add a step to do that (willing to buy a “CC requestor outcome” checkbox on the approval card, Microsoft…). At this point, you probably want to have different email text and action happening for each different approval outcome (e.g. Approve vs Reject). You probably also want to be able to send the commentary on the approval to the submitter, particularly if it was rejected, as they would be interested in the rejection reason.
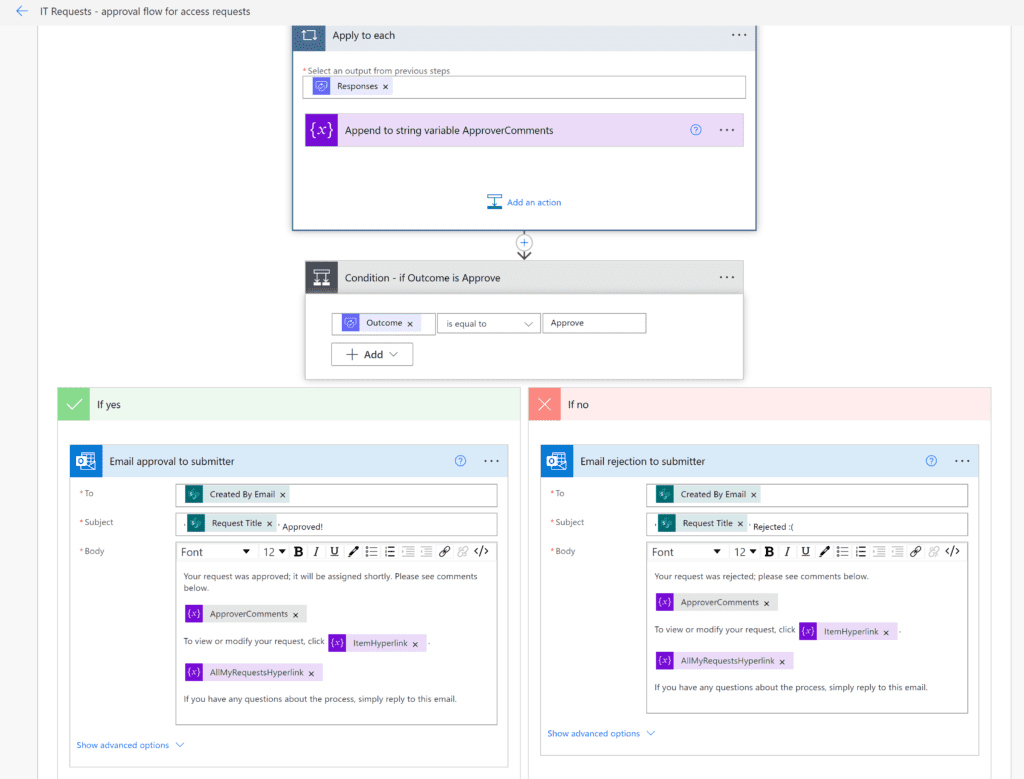
Let’s put the approval comments into a variable so that we can reference it in multiple places
We need to be able to put the outcome and comments in an email and in our original SharePoint list item so that if we need to go back and see what happened with a request we can actually see what was going on. To do that, the most convenient way I’ve found is to put it in a variable.
Way up at the top of your flow by your other initialize variable steps, add another initialize variable for ApproverComments. We’re going to assume that you are using a “first to approve” type approval, if you’re using a different type you’ll need to do some more hoop jumping to format the comments properly.

Leave the variable blank in the initialize step, we need to set it after the approval.
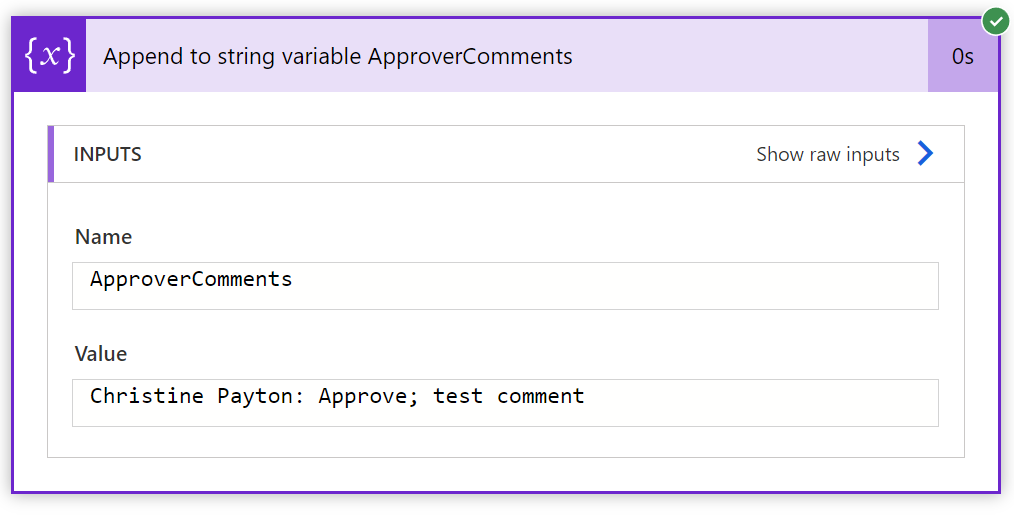
Scroll on down to the approval step, and add a “Append string to variable” action directly below it. We are using append here because Power Automate assumes there will always be multiple approver comments attached to any approval, even if you only have one approver. Select the variable we just created to append to, then double click the “Responses Approver name” dynamic content to append. This will automatically add an “apply to each loop” for each response – this is normal, just continue on.
At this point, I like to add a semicolon and a space, then insert the “Responses Approver response” dynamic content – this is the Approve or Reject text value. Then I add a semicolon and a space and the “Responses Comments” – this is the comments the approver adds when they respond.
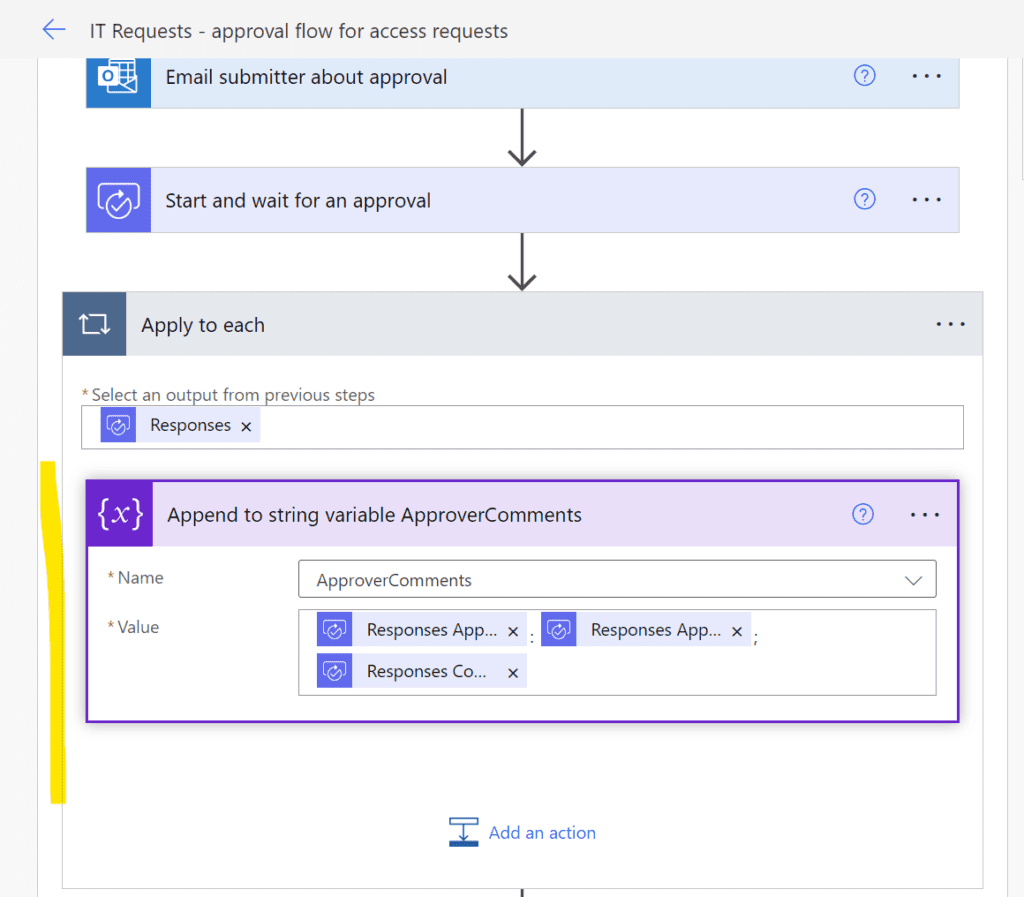
So what we’ve done here is created a text string that has, for each response, the approvers name, the outcome, and the comments all in one package. If you have multiple approvers and are waiting for all to respond, you could tack on a pipe character and some spaces or similar to the end of this field to separate out the different approvers and their responses when there are multiple. It looks like this when it runs:
Insert our approver comments and outcome into an approval/rejection email
You’ve got two ways you can play this – you can either add a condition that checks the outcomes and performs different actions according to whether it was approved or rejected, OR you can use the actual outcome as a dynamic value. For example, in your email, you can say for the subject “Your request outcome was <insert outcome dynamic content here>”.
I’m going to use the conditional branch method because I feel like perhaps most people want to do a little hand-holding around the rejection and potentially have different language around that. So, at the very bottom of our approval flow, add a condition step that checks if the Outcome is equal to Approve (not Approved… Approve is the text of the outcome for the default approvals). Insert your ApproverComments variable that contains the approver name, outcome, and comments into the email.
Now we need to let SharePoint know about the approval!
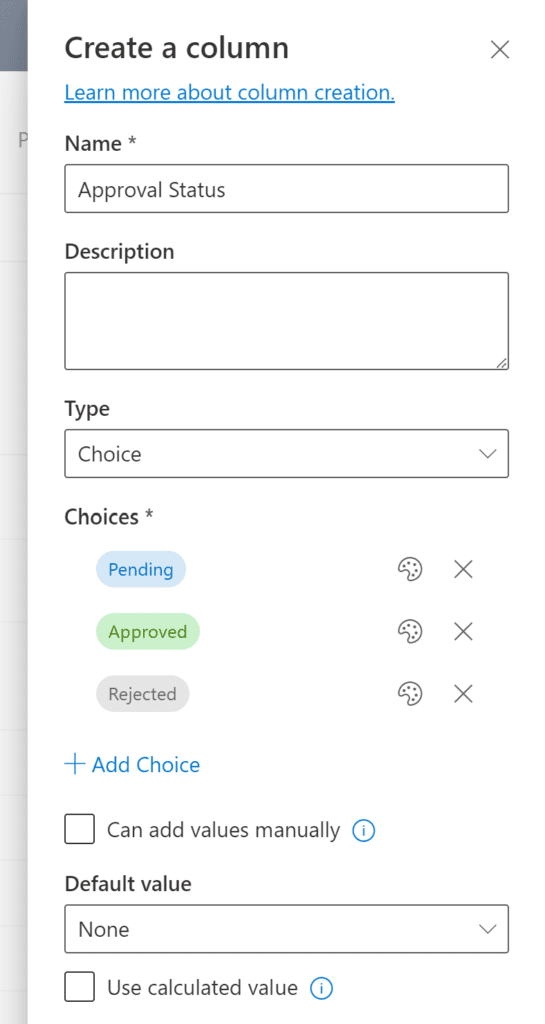
At this point, nothing has communicated with the SharePoint item to tell it that an approval has happened. We should probably log the fact that an approval happened and what the comments were in the SharePoint list item. I like to do this with an Approval Status field (Pending/Approved/Rejected choice values) and a notes or comments text field. Specifically, for approval comments, I really like the “append changes to text” option for text fields, which gives you an automatic date/timestamp for the comments. You can use this kind of like a history tracker for an item, updating it when various things happen (you can see a screenshot of what this looks like further down the page).
Add the columns to the SharePoint list
Navigate to your SharePoint list and use the “add column” option in the view to add a choice-type field for Approval Status. In my case, only some of our request types require approval, so I am setting the default value to blank, but if all items in the list require approval you’ll want to set the default to “Pending”.
If you don’t want your form submitters to be able to modify this field, you can hide it from the form using the technique described here – enabling content type management and setting the field to hidden in the form. Make sure the field is still displayed on the list view if you hide it in the form so you can see what is going on with it. 🙂
Next add another field, multiple lines of text, append changes to existing text enabled for your comments.
**Note: You will need to save, close, and re-open your Power Automate flow in order for it to realize that you’ve added these new fields.
Set these fields using the “Update item” action in Power Automate
A week or more of time could have passed since the initial flow trigger, so immediately after the approval step I’m going to add another “get item” step to re-get our item details in case anything changed during the time our approval was going on. We’re doing this because updating a SharePoint list item in Power Automate forces you to re-set any required fields to their same value, and our current value from the initial trigger could be stale at this point.
Next, add an “update item” action to each branch of your approval outcomes. Set any required fields to their same value from your more recent “get item” action, and add your outcome value to the Approval Status field we created above. Use your variable that is holding the approver name, outcome, and comments to the Comments append-text field:
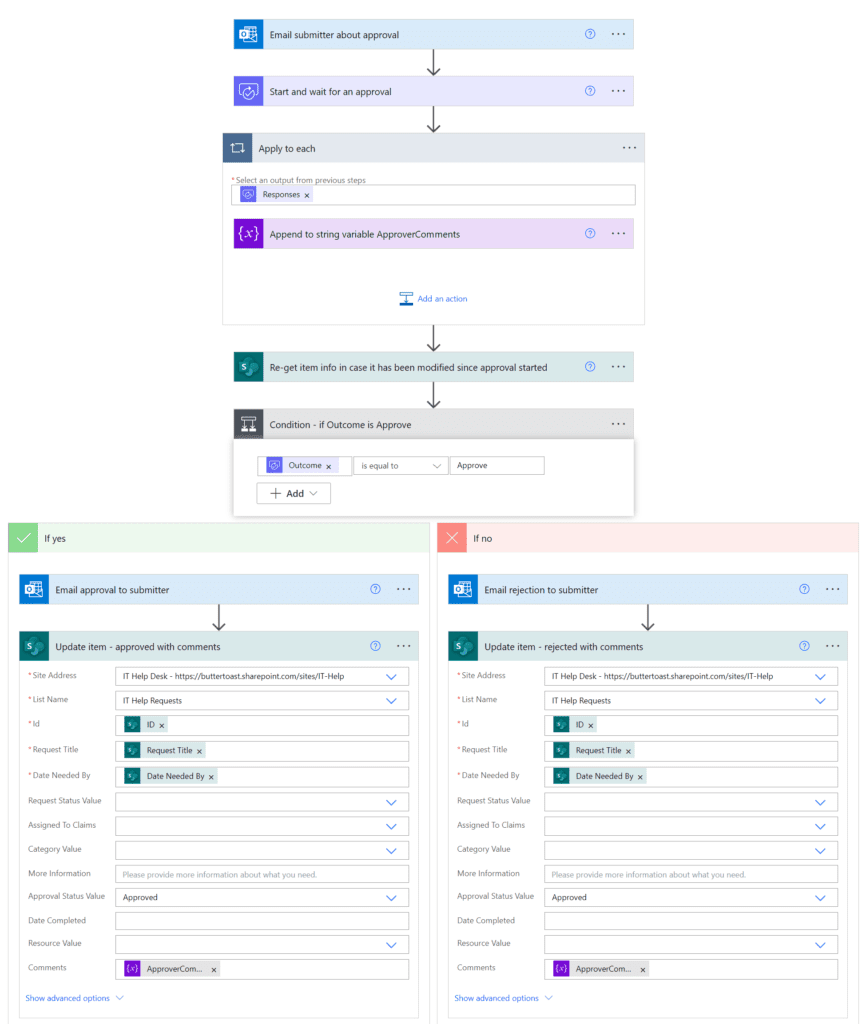
Make sure any choice columns that have a default value are erased or set to their current value (Power Automate will default to setting them to the default choice instead, which is no bueno).
When we test the flow now, this is the outcome: on approval, the approval field is set in SharePoint and a comment is added to the text comment field. The username that the comment is “by” will be the user account running the flow – so hopefully in your case, a service account (I like to name my service account “Power Automate Service” so that everyone’s clear about what it is), but since I didn’t use one here it’s “by” me:

Now, to handle the things that could go wrong with our approvals
Error handling is an important step of any real-life flow. The most common issue you’ll experience with approval flows in normal usage is people missing the notification and forgetting to respond to it. They might claim they “never got the email” – I’ve seen a lot of these, and 99% of the time they did actually get it, they just missed it. It sounds somewhat trivial, but this kind of thing can make or break an approval flow – you really need to have some sort of reminder system in place. I also like to have a notification that triggers on approval timeout, in the case that they never respond.
Since this article is getting very lengthy, I’ve made approval reminders into a separate article: “Approval reminders in Power Automate (with timeout error handling)“.
Whew, we’re done (for now)
This ended up being quite a bit more involved than I intended, which seems to be generally how these things go… here’s a screenshot of our finished approval flow. It looks more complicated than it is; once you get rolling it doesn’t take all that long to set up.
