Request management (a.k.a. ticketing) can be extremely useful as a tool to manage and track work on a team.
At the end of the day, this is essentially a form with a status field to track progress and automated alert rules. This is a replacement for email-based intake of work: the act of putting requests into a “ticket” increases visibility and transparency, and makes it easier to manage requests. It also allows you to easily tack reporting on things such as request volume or what percentage of your requests are responded to on-time (your SLA or service-level agreement).
I’m intentionally putting “easy” for the “easy way” in quotes, because even implementing prefab ticketing systems can be tricky – for example, I’ve heard horror stories of Zendesk implementations sliding off the rails on very basic things. In my opinion, this is the easiest way to configure ticketing using M365 apps in a way that gives you the best of the possible worlds as far as fast setup, easy maintenance, and good functionality. I would recommend it for smaller-scale implementations, meaning somewhere under a thousand requests per month.
In this example, we’re going to be building a lightweight IT ticket system using SharePoint and Power Automate – this can be created, customized, and ready to go in a single day if you have some familiarity with the tools and your requirements nailed down.
We are intentionally avoiding Power Apps in this example – Power Apps is … powerful, but causes you to have to recreate the wheel as far as list view interfaces go and more than doubles your complexity/maintenance. If you need some functionality it has that you can’t get with other tools, by all means use it, but it’s not my go-to for basic forms with workflow in its current state.
Let’s get started!
Step 1: Build a group-linked SharePoint site to house the data
Depending on whether or not your organization has enabled self-service site creation, you may be able to do this yourself – otherwise you may need to ask an admin to get the site up and running (assuming you don’t already have one you want to use).
The reason we’re using a M365 group-linked site here is so that we can keep the permissions, shared mailbox, and content all connected together. We can use the shared mailbox that comes with the site to send the email notifications used in the workflow process – that way the emails will come from the “IT Helpdesk” instead of from a generic user account. More on this later.
For now, we’ll create a site.
Click the word “SharePoint” in the top toolbar to bring up the SharePoint “start” page. If self-service site creation is enabled, you will see the option to create a site on that page. If not, create a site from the SharePoint admin center (or have an admin create one for you).

Choose a “Team” site from the available options, give it a name, and add your owner and members. We’re choosing a Team site here so that we can use the mailbox that comes with it later. Make it a private site – you’ll add your all-staff to the site visitors group in a minute (public sites cause anyone interacting with the site to become a group member, which you do not want here).
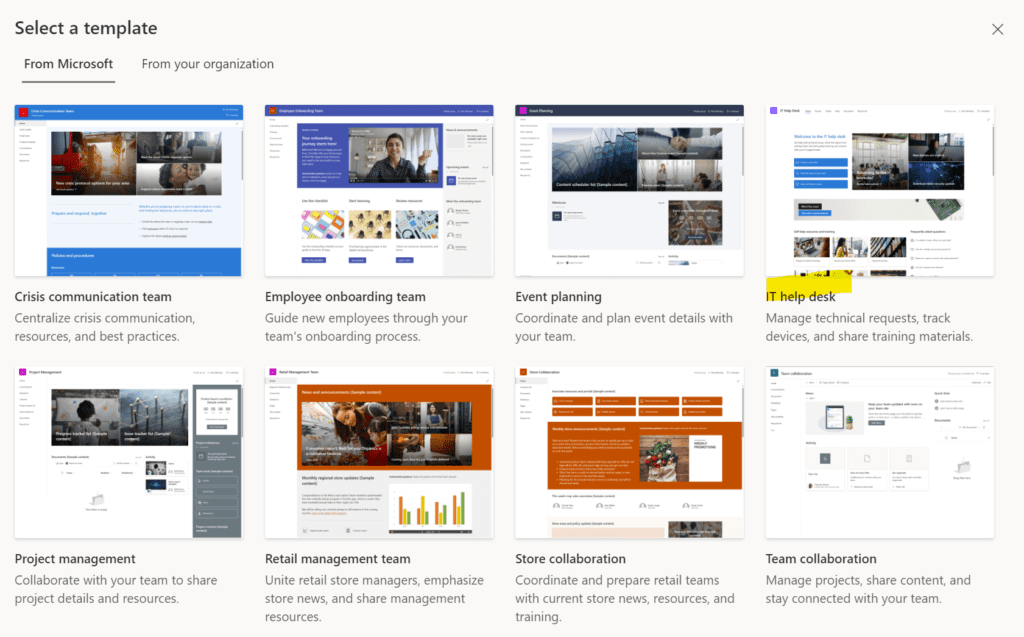
When you finish creating your site, you might get prompted to select a template. Feel free to choose one if you like – it does help quite a bit with getting started making a homepage, just keep in mind you’ll need to go back and clean up any bits and pieces you don’t want to use later.
I’m going to choose the IT Helpdesk template. If for some reason you don’t get the prompt and want to use a template, you can navigate to the selections for it in the gear menu, in the top right corner of the page.
Add your site “visitors”
Your site “visitors” are the audience for your SharePoint site and requests list: the people who will be filling out your form later.
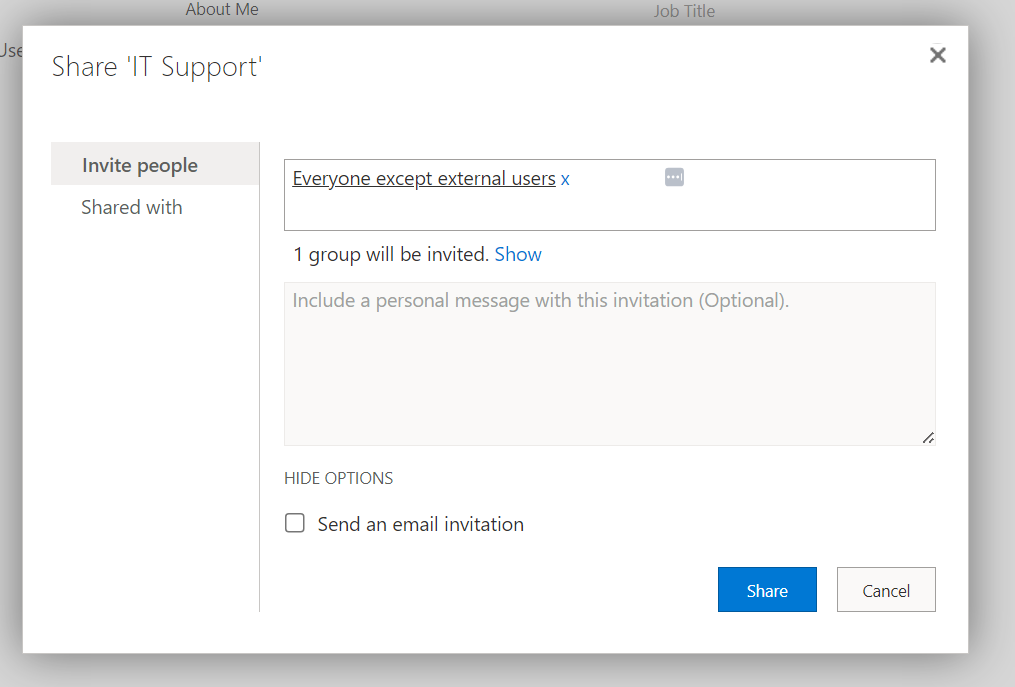
If you have an Active Directory (“AD”) group of some kind that has all employees in it, use that here, otherwise you can use “everyone except external users” (this is a built-in group that includes everyone in your organization). Make sure to uncheck the “send an email” box when adding visitors, particularly if the object you’re adding can receive mail (usually AD groups are safe here but I uncheck it anyways out of habit).
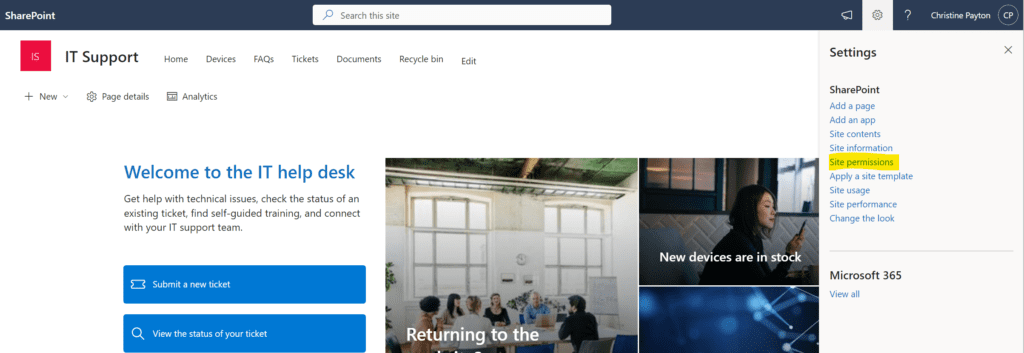
Navigate to the gear menu -> site permissions -> click the advanced permission settings link at the bottom of the site permissions menu.
Open up the visitors group by clicking it.

Then click the “New” button and choose “Add Users”.
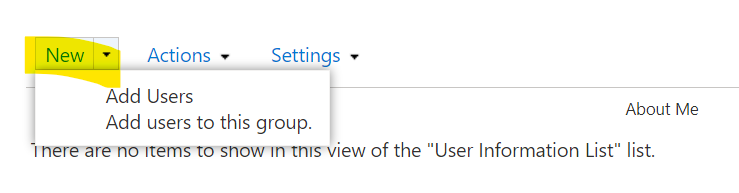
Choose your AD group or “everyone except external user” (whoever you want to be able to view the site and fill out the form). Uncheck the “send an email invitation” box when sharing unless you want it to send users an email. Note: basic AD groups can’t receive mail, but it’s good to get in the habit of considering this box, when sharing!
Create the SharePoint List
The site template I’m using came with a ‘request list’. We’re not going to use that one! We’re going to make our own. We’re going to use a SharePoint list to house the data for our ticketing system.
We could use Dataverse here, however: Dataverse will trigger premium licensing when we get to Power Automate later on. So, to stay with basic-tier licensing, SharePoint is our go-to.
Do not use Microsoft Forms for this application – Forms is good for surveys and collecting data, but not so much for managing requests where you need to be editing fields and triggering notifications on changes to records.
Use the app launcher waffle menu in the top left corner of the screen to navigate to Microsoft Lists. We’re creating our list from Lists and selecting the Team site we made earlier as the location.
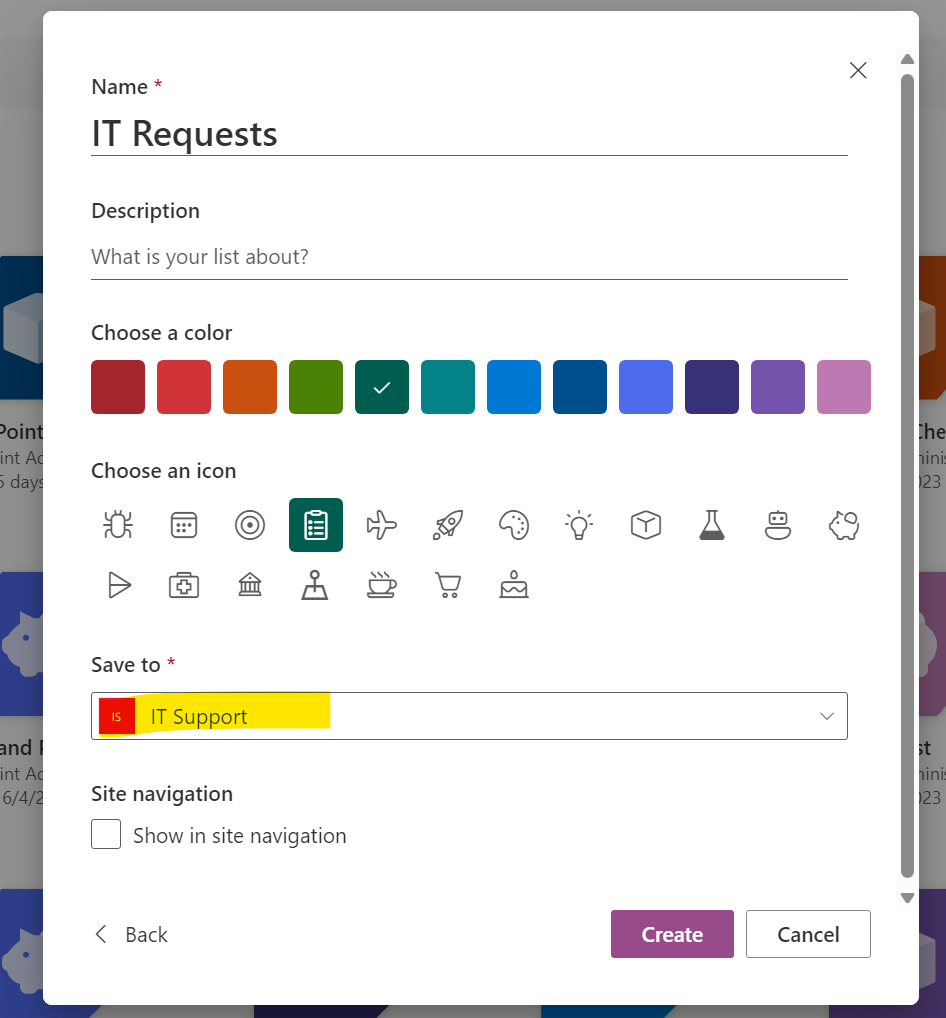
Note that if you have a newly created site, it can take up to an hour to show up in the list of recent sites to add to. You could create your list directly from the SharePoint site if you prefer, but Microsoft Lists will let you select an icon and color for your list when you set it up, which is kind of nifty.
Choose to create a “blank list” from the options.
On the next screen, name your requests list and make sure to choose the site you created in the previous step for a location (you can’t easily move this later).
Add your fields
Click the “add column” option in the list view and add the fields you’d like to use.
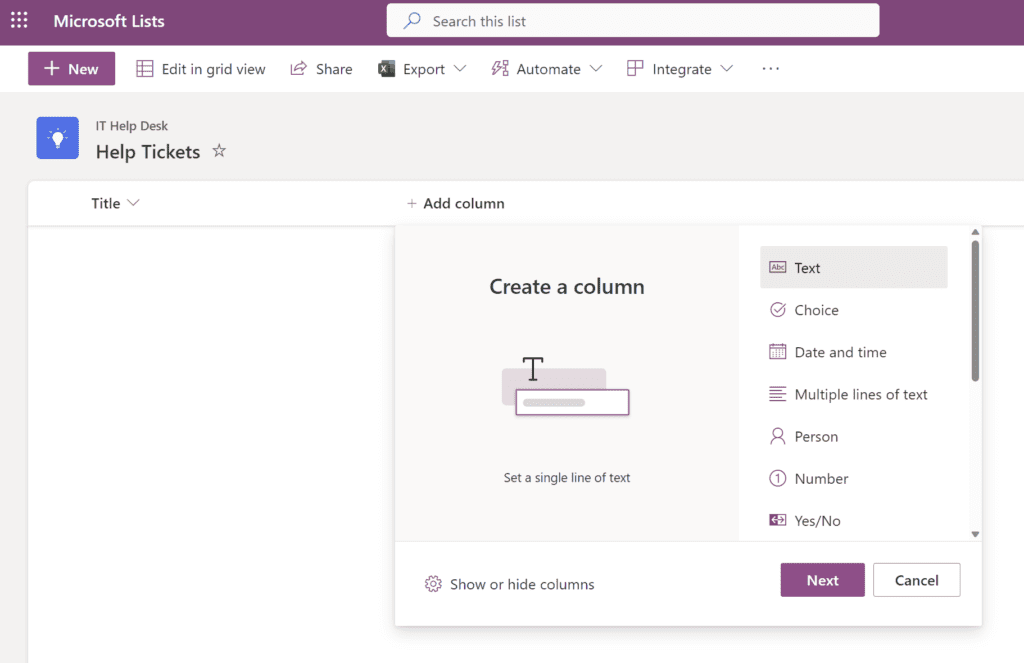
I like to use the following, at a minimum:
- “Assigned To”: Person-type column, not required, single-value
- “Request Status”: Choice-type, single-select, not required, values: Pending, In-Process, Complete, Cancelled, default value “Pending”
- “Date Needed By”: Date-type, required (this is what will let us determine later if the request was completed on time, in addition to helping us prioritize, and can be used for conditional formatting)
- “Date Completed”: Date-type, not required (again, this is used to calculate if the request was completed on-time)
- “Request Details”: Multiline text type, plain text (not rich text), not required (sometimes people can cram their whole request into the Title field, so optional is fine… whatever your preference)
Do not add a field for “submitted by”, “submitted date”, etc – those will be automatically logged by SharePoint as “created” and “created by”. You can use the “show/hide” button in the “add a column” menu to show these fields if you like. You might also opt to show the ID field at this point – we’re going to use the ID field later.
If you want to rename any of the base fields, now is a good time – for example, I prefer to rename “Title” to “Request Title” and add a description that helps people know what to enter here when they are submitting the form.
You could choose to hide the title field if you want, but I feel like having a title to refer to tickets by is useful here. You can rename fields by going to the gear menu -> list settings -> clicking on the name of the column you want to modify in the Columns section.
Optional: Hiding certain form fields
You might decide at this point that you don’t want your form submitters to be able to modify “assigned to”, “request status”, or “date completed” when they are filling out the form. In modern SharePoint, you cannot make certain fields read-only in the “submit” form without also hiding them in the “edit” form (unless you venture into Power Apps, which we are intentionally avoiding in this particular tutorial).
What that means is, if you want to prevent users from interacting with these when submitting, you need to hide them from all forms.
Interestingly, if you hide these fields in the forms, you can still modify them using the “edit in grid view” functionality in the SharePoint list, which is typically where people who are managing the items are going to be interacting with the data anyways – so it works out! Just keep in mind here that you want to make sure everyone’s aware of how to do this. 🙂
To hide fields in your form, go through the same steps that are listed in the article on how to hide the title field, but hide all fields you don’t want your submitters interacting with.
Once you’ve done this, you can still modify these fields in the list view with this button:
Set the permissions on your SharePoint List so that your site visitors can submit it
In an earlier step, we added all staff to the “visitors” site group. Now we need to give that visitors group access to submit our form. By default, visitors can only read content in the site – we need to give them permission to “contribute” to the list.
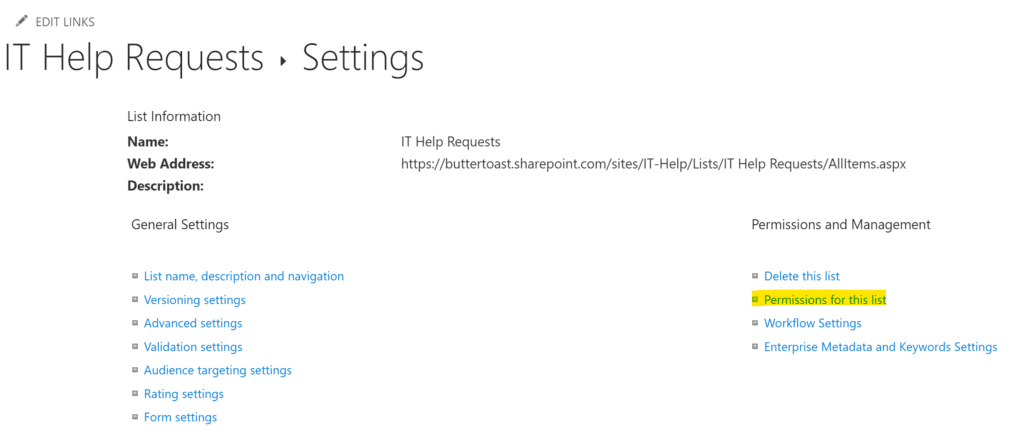
Navigate to your list settings (gear menu -> list settings). Click on “Permissions for this list” under Permissions and Management:
Click on the “stop inheriting permissions” button. This is what lets you set the permissions on your list/form to be different from the permissions of the larger site. Click “ok” on the popup confirmation.
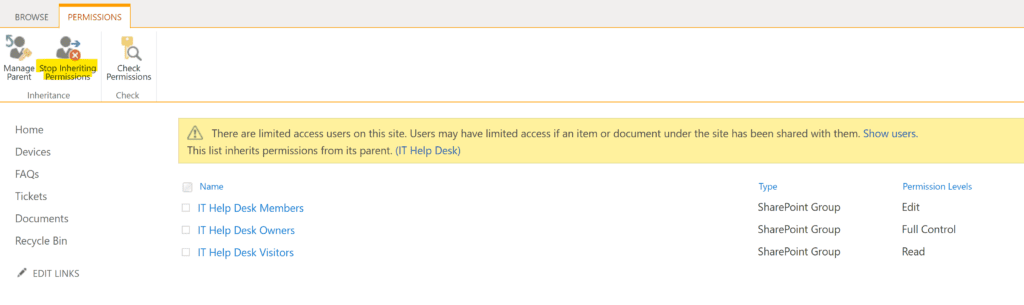
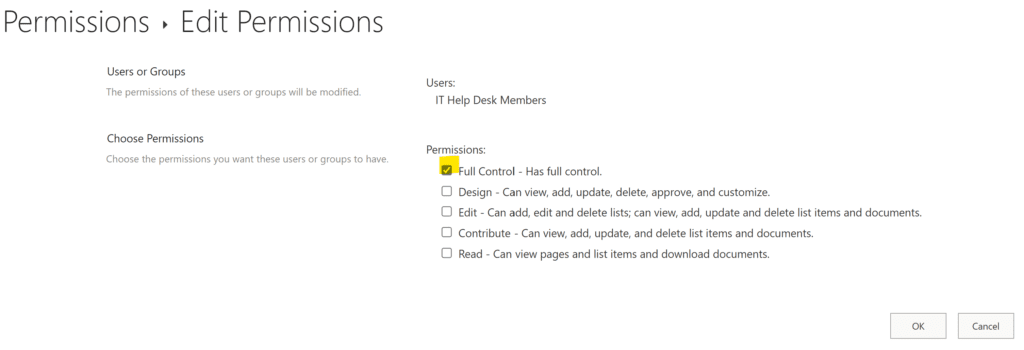
Select checkbox next to the visitor group for your site, then select “edit user permissions” to bring up the permission level selector:

Then change the access level for this group to “contribute” instead of “read”.
Do not select “edit” – “edit” in SharePoint means that they have access to modify list settings or even delete the list itself. Contribute is what you want here, which just lets them create and modify list items.
Consider advanced permission settings
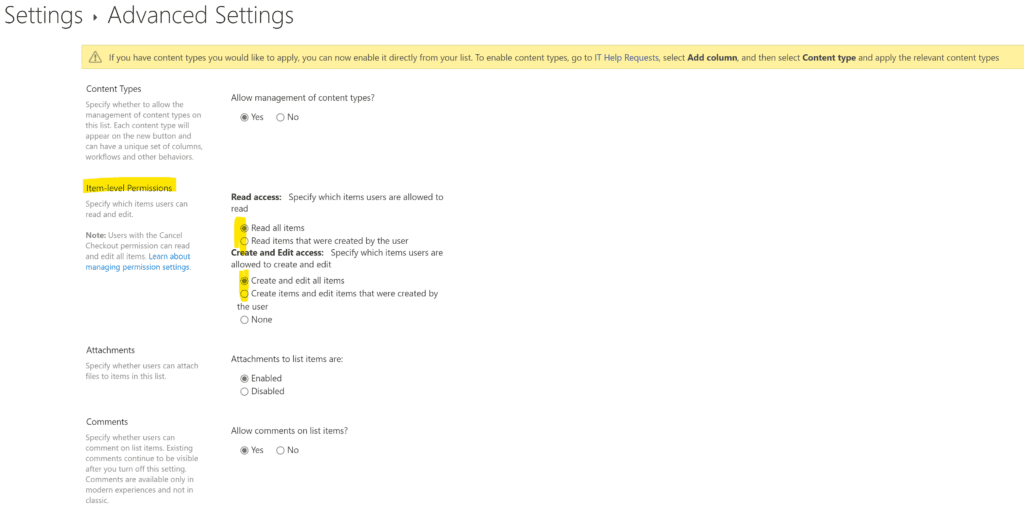
SharePoint lists have a feature that allows you to set it such that:
- Users can only see the forms that they’ve submitted and/or;
- Only modify items that they have submitted
You can enable these in Advanced List Settings (gear menu -> list settings -> advanced settings link):

Toggle them to your preference here – if you’re dealing with any kind of sensitive form data (e.g. HR forms), this is an important feature.
When you toggle this on, you need to give people managing your requests full control permission in order for them to be able to view all items.
Typically those people will be in the member and/or owner group for the site. The owner group has full control by default, but if you need the member group to be able to view all, navigate back to your list settings -> “permissions on this list” (same place we were giving contribute access to visitors above) and select the checkbox next to the member group and give them full control in the same way:
Note that if you are using a service account for Power Automate or to connect to the data in your list, that service account also needs full control in order to interact with all items in the list if you have “users can only see their own items” enabled. You can either add the service account to the member group for the site, or just share full control access at the list level to do this.
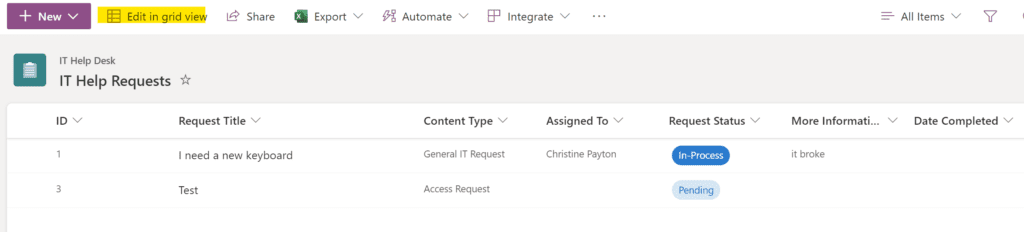
Get the hyperlink to your form(s)
Click the “+new” button from your list view to open up your form. Use the “copy link” button to get the hyperlink directly to the form.
If you’re using the IT Helpdesk SharePoint site template, you can use this hyperlink for the “submit a new ticket” button on the homepage, create a new landing page with Quick Links buttons to your form and list views, or send it out in an email!
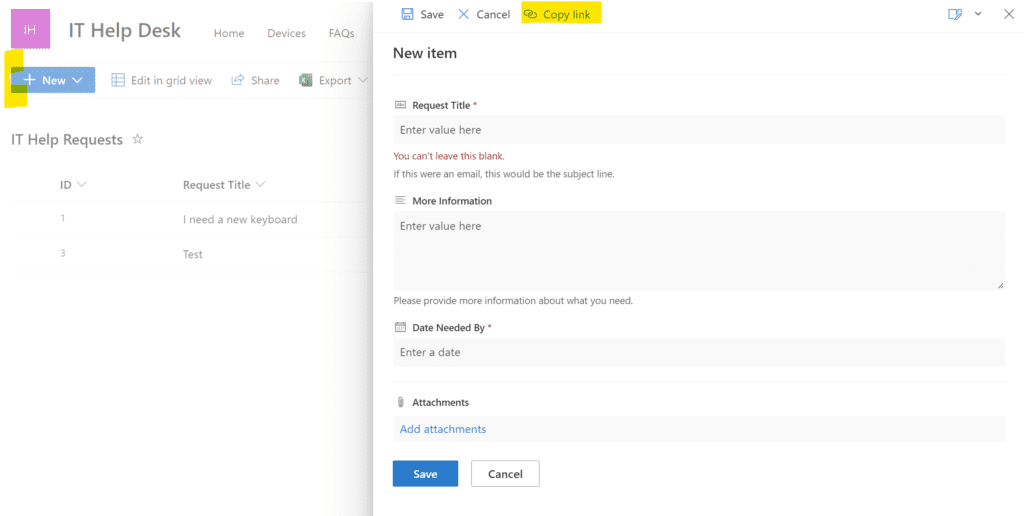
The “copy link” button will give you a working hyperlink that includes the content type ID for your form, so if you have multiple forms in the same list you can copy it the same way for each form. If you want a shorter, cleaner link to the base form, it’s always at your list URL with “newform.aspx” tacked on to the end like this:
https://tenantnamehere.sharepoint.com/sites/sitenamehere/Lists/listnamehere/newform.aspx
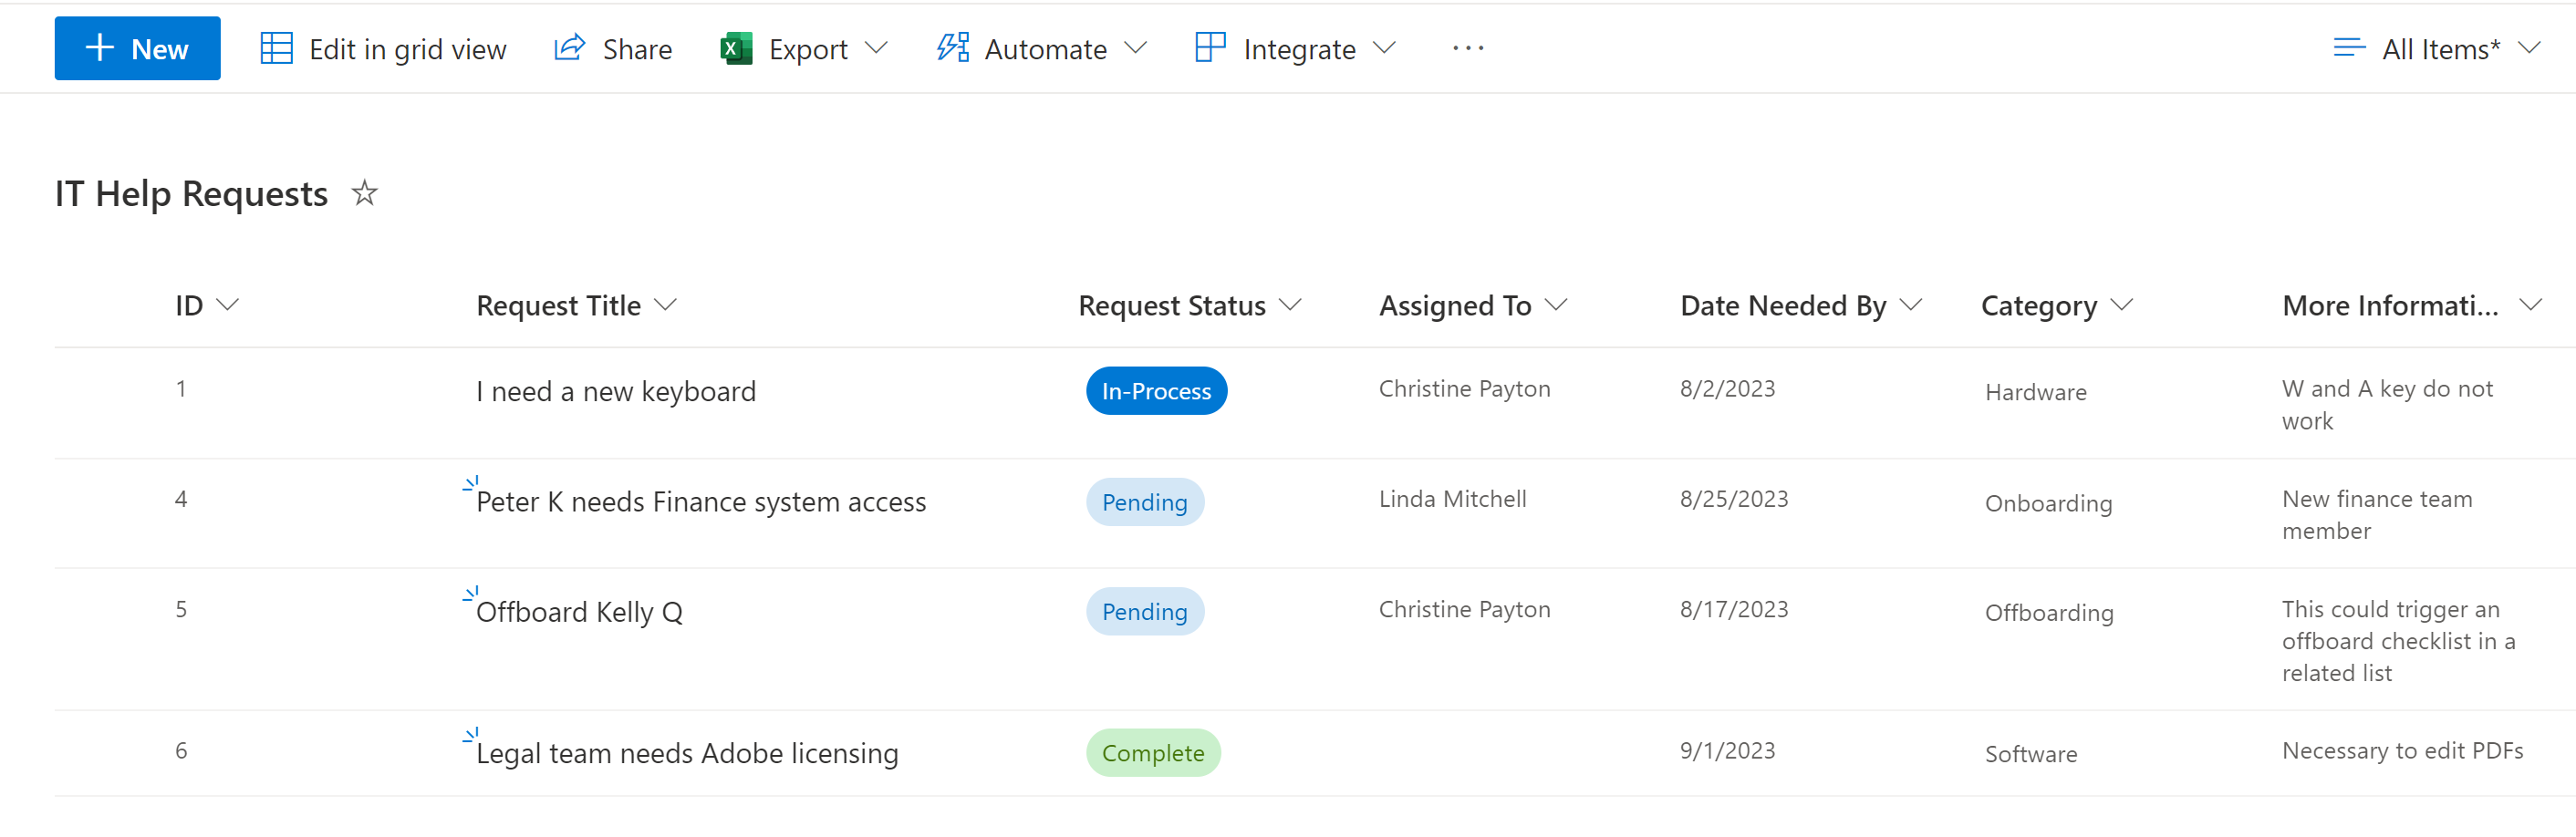
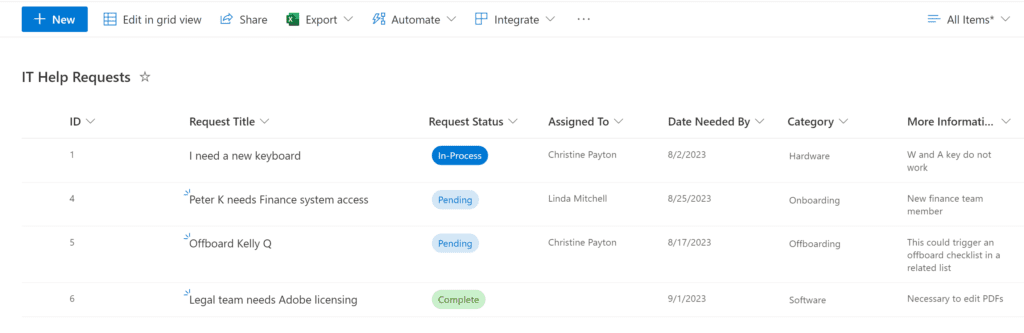
Configure your List Views
For any sort of request management interface, it’s nice to have views for:
- Records submitted by “me” (filter: created by = [Me])
- Records assigned to “me” that are not complete (filters: assigned to = [Me] and request status not equals Complete)
- A grouped view, grouped on assigned-to and status, for items that are not complete
- All items (this is a freebie, it comes with the list)
We’ll use these views in our Power Automate flows – linking our submitters to a view of all of their items in the email notifications in case they’re unfamiliar with the view selector – but they’re also really good things to put on buttons on a landing page for your SharePoint site.
You can create a new view for 1-3 above and configure the filters in the “edit the current view” menu option:
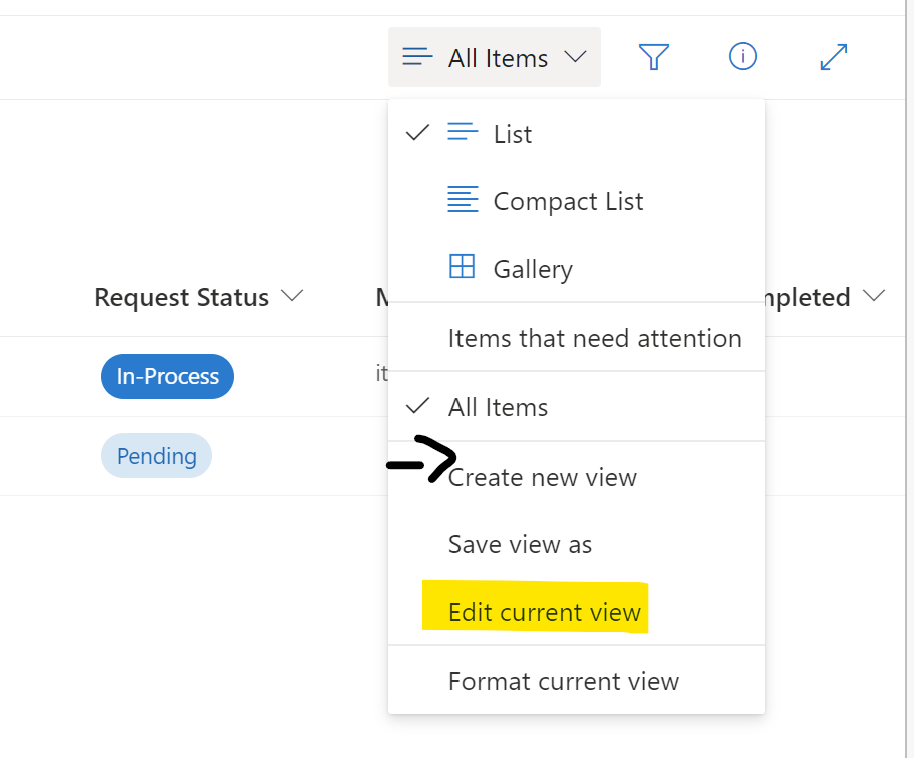
For example, the “assigned to me” view filter would be configured to look like this:
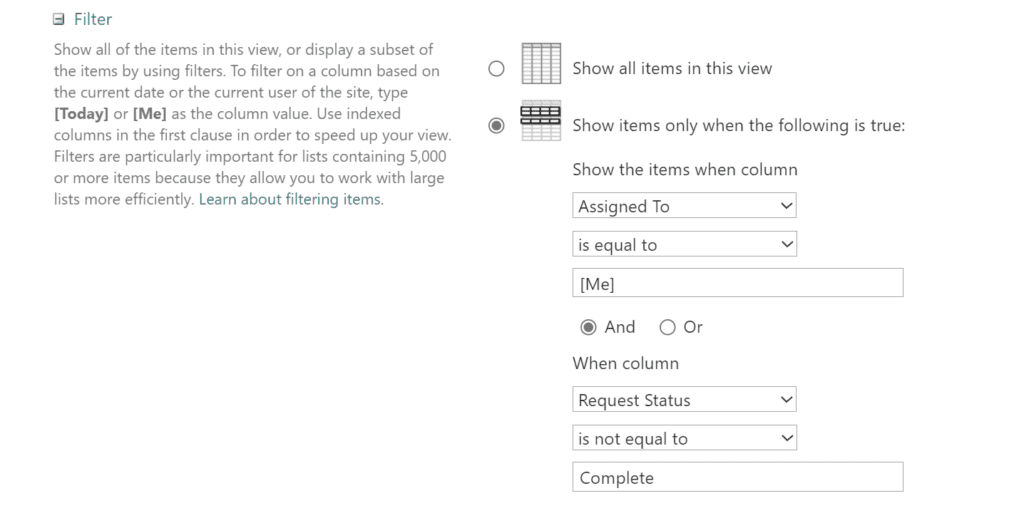
I also like to have all views sorted by created date, descending order.
While you’re thinking about list views, you might consider adding dynamic date filters to any views that you expect might exceed 5000 records at a later date – we like to be proactive instead of reactive. 🙂
List view conditional formatting – highlight overdue or high-priority items
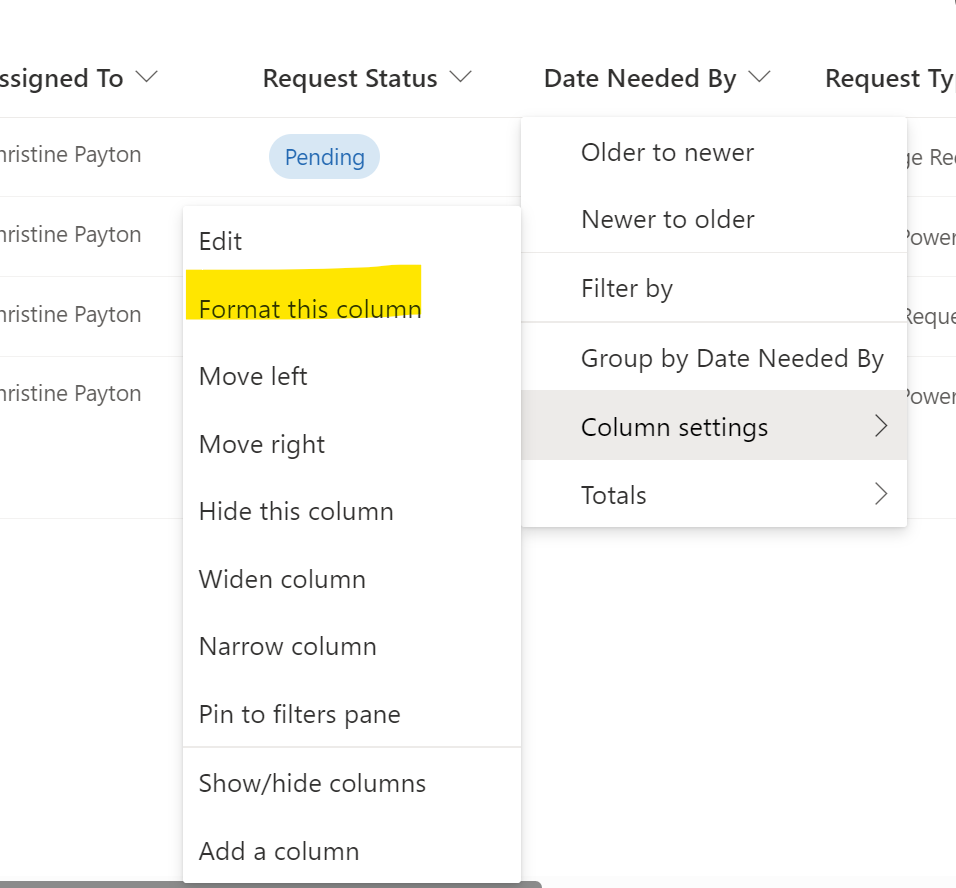
Conditional formatting pretty much sells Microsoft Lists for me. It’s awesome, particularly in comparison to classic lists. Color formatting for a single specific column is easy – just go into the column settings menu and add it there. You can reference things like today’s date and “me” in your rules:
Things start getting a little tricker if you want to add icons or have rules on multiple columns at once. For example, what if we want to highlight requests that are both not complete and past their date needed by? We can do this using row-level formatting; I’ve split this out into a separate article as I think it’s widely applicable to other list applications.
Make it a little bit fancy if you like!
You can customize the look and feel of your form to add a colored header with an icon and sections for your fields in just a few minutes. We do this without Power Apps here to keep it simple, but if your aim is to go totally wild on the customization, Power Apps would be your next step.
You can use Power Apps in conjunction with the SharePoint list – either for just the form OR to replace both the list view AND the form – it’s up to you.
Want to redirect your form submitters to a thank you page after submitting? Here’s a quick technique for that.
Next up – add workflow notifications!
Any decent request management system will have notifications that go out to users on events.
I like to start with a confirmation for new requests that go to the submitter, a notification to the team that manages the requests, and another notification process that triggers on status changes. I prefer picking and choosing what sends an email (e.g. just status and comments) rather than all modifications, to keep it from getting too spammy. These posts are coming soon (I will add links below as I complete them):
Want to add on an approval flow? See “How to create a GOOD Power Automate approval flow”.
Want to add email notifications for ticket completion and/or automatically setting a closed date field to get a “days to complete” measure?