Setting form fields in Power Pages via the URL – meaning that when someone clicks a link, certain fields are pre-set according to content in the link – can be done with JavaScript in Power Pages!
The documentation on this is a bit light, and Chat GPT was not very useful in writing code to do this, so I thought I would share here.
As a disclaimer, I don’t actually know any JavaScript, but I was able to muddle through the process using this blog as a reference.
This functionality is useful for targeted forms: for example, asking someone to submit feedback for a product, and hard-coding the product ID reference into the link URL so that that feedback is associated with the form.
We’re specifically using Power Pages for this because Microsoft Forms does not currently have any way to do it, and Power Apps (either model-driven, or canvas) can do it – but will require the submitter to have a M365 account and license. Power Pages forms can be submitted by all users, even anonymous users, making it much more accessible!
Step 1 – Create your tables & add your form in the Power Pages UI
In this example, we’re asking users to submit feedback on policies.
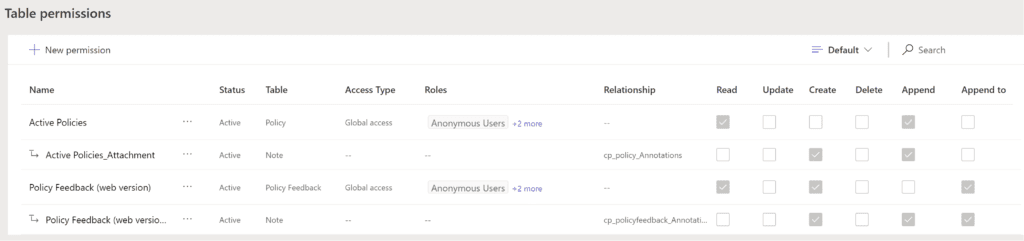
We want to create a table to hold the feedback and the submitter’s email address, and it will have a lookup column to a policies table that we will pre-set with the URL parameters. Set your permissions – if you have lookup columns, remember to do your append/append to!
I get append and append-to confused constantly… this configuration worked well for my use case:
Step 2 – Edit the custom JavaScript file for the form
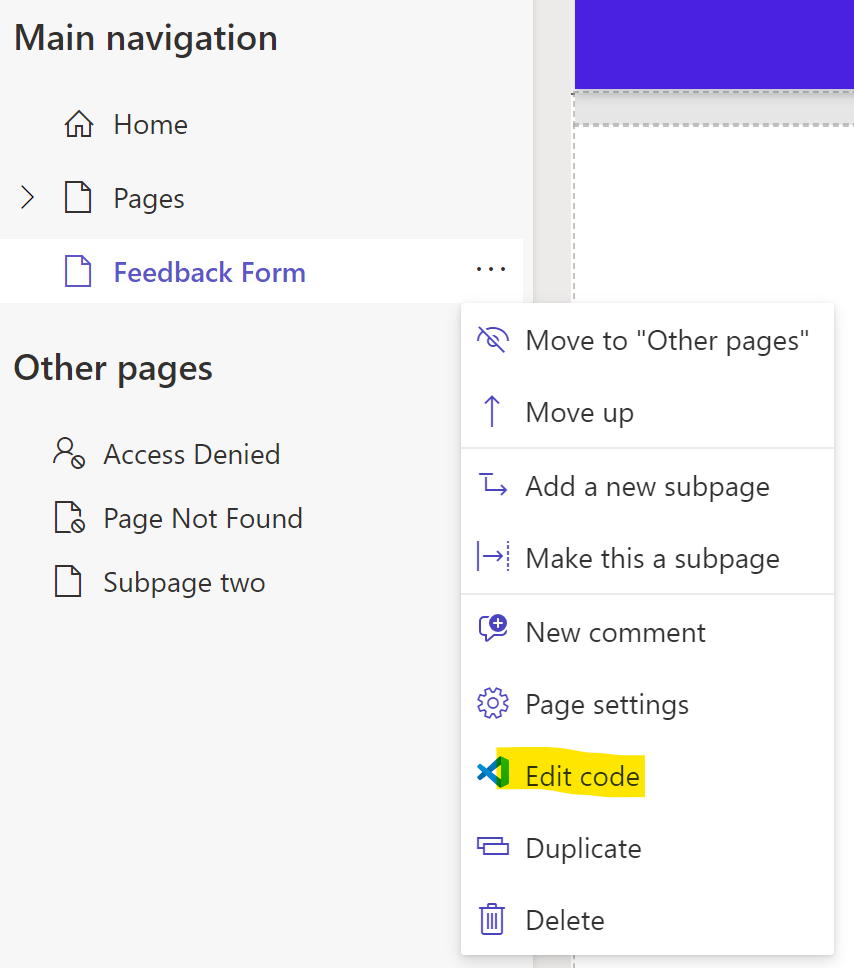
You can get here through the ellipsis menu – next to the form in the UI:
Below is the JavaScript I used to set the lookup field. This will work for other field types as well, but lookups require special handling as to set them you need to feed it:
- the GUID of the record you’re setting it to;
- the name of that record, and;
- the name of the entity table that it is from.
$(document).ready(function() {
    // Retrieve the values from the URL parameters
    var urlParams = new URLSearchParams(window.location.search);
    var recordId = urlParams.get('recordId');
    var recordName = urlParams.get('recordName');
    var entityName = urlParams.get('entityName');

    // Set the policy lookup field
    $("#cp_policy_name").attr("value", recordName);
    $("#cp_policy").attr("value", recordId);
    $("#cp_policy_entityname").attr("value", entityName);
The first section here is creating the parameters we want to use in the URL. The second section is setting the values in the field.
All of these are being used to set a single lookup column called “Policy”. If you are working with a plain text column (which is probably a good idea to start), you can add just one line in each section, using the normal schema name of the column to set it.
If you’re using a choice column, you need to set three values per field. As far as I can tell these regularly follow the naming convention above, where you can select the GUID with just the table schema name, then add _name to get the name field (this is the text label on the lookup) and _entityname to select the entityname.
Anyways – put the JavaScript in the custom JS file that is in the left navigation, when you open the code editor. Save it, then go back to the prior page and press the “sync” button to get your changes reflected in the form.
Step 3 – Create your URL
What I like to do at this point is to hand-craft the first URL, to make sure everything is working.
This example will use the parameter names in the first section of the code above, and set them to be equal to some sample data that exists already in the table. Make sure to start with the URL of your form page, then tack on your parameters:
https://<examplepowerpagesurl>.powerappsportals.com/Feedback/?recordId=667b440a-3999-ee11-be37-000d3a5a7956&recordName=exampleRecordNameHere&entityName=cp_policy The parameter string starts with a ‘?’, then each parameter is tacked on with an ‘&’ between.
I tested this with a lookup value with spaces in the name and it seemed to work fine without encoding the URL, but it’s probably safer to do that – particularly if your names can have special characters.
Step 4 – Optionally: hide or restrict editing of the pre-set fields
I don’t want people to be able to change the lookup field. I tried setting the form field to disabled in the form settings, but this prevents the JavaScript from setting the field… so, I opted to hide the field with JavaScript, and then display the name of the lookup at the top of the page.
Like I mentioned earlier: I don’t actually know JavaScript, so the code below was written with some help from ChatGPT and I can’t vouch for this being any kind of best practice. 🙂
    // Hide the second parent (assuming it's a <td>) of the field
    $("#cp_policy").parents('td').eq(0).hide(); // Hide the first <td> in the ancestors of the field

    // Display the current value of cp_policy_name at the top of the form
    // Prepend the text "Providing feedback on: " to the record name
    $("#displayPolicyName").text("Providing feedback on: " + recordName);
});
The second section above is showing the policy name from the URL wherever the ID “displayPolicyName” is used in the HTML on the page, so I stuck a div in the HTML file (NOT the JS file) right above the form to link it in (make sure to sync after saving):
<div id="displayPolicyName">The selected policy name will show here when it is set.</div>Step 5 – Generate the URLs
The next logical step here is to take the format of the URL we created above and automate it!
Logically, this would be a calculated column on the policy table, where you’d have a URL to submit feedback for each policy, then use that in the Power Pages implementation.
The issue I ran into here: you don’t seem to be able to use the GUID field from Dataverse in modern formula or classic calculated columns. So, I just set it with Power Automate.
I have it running both when policy records are created or modified, since the policy name is one of the parameters. When you do this, be careful to set a condition to check for before the “update row” action – otherwise you could end up with an infinite loop. Dataverse does not seem to have trigger conditions that you can set to prevent this like SharePoint does (if you know of one let me know!), so you have to get creative.
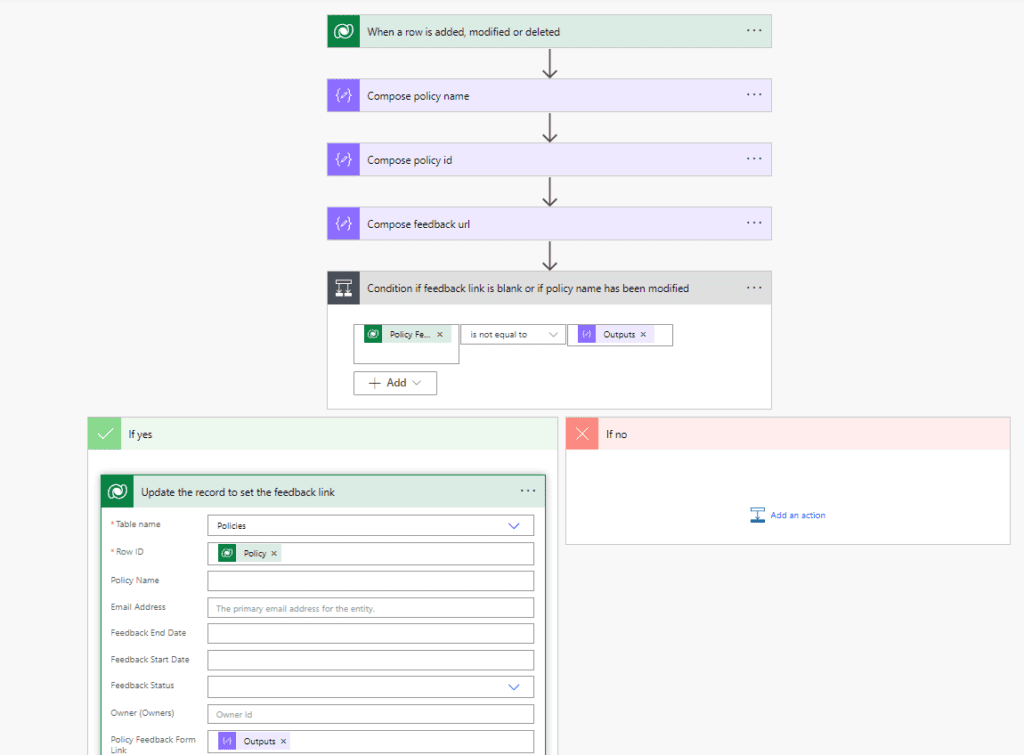
The first two compose steps are just grabbing the trigger name and id dynamic content, because for whatever reason the third compose step couldn’t “see” them. The third compose step is an expression that creates the URL to set the field in the form:
concat('https://<examplepowerpagesurl>.powerappsportals.com/Feedback/?recordId=',outputs('Compose_policy_id'),'&recordName=',outputs('Compose_policy_name'),'&entityName=cp_policy')The condition step is checking to see if the URL it’s crafting is already equal to whatever is in that field.
- If it is, it doesn’t do anything.
- If it isn’t (this would be the case if it were newly created or if the name changed), it updates the record.
Again: this is necessary to update the link if the record name changes, without triggering an infinite update loop.